Let's just put it up front, Google Photos is awesome, to the point it is perhaps our favourite Google product in years. Google introduced the photos app this year to take over the reins from Google+ photos, which it killed. What initially was just a very simple way to back up your photos from your Android phone has been jazzed up with some amazing features. Some basic stuff first: the app gives you two options to back up your photos. You can use the app to back up your photos without consuming any space on your Google Drive account by allowing Google to downsize the or upload the original quality and take up the available space that you have on your account. But there's more to the app that this. Here's what you need to know to make the most of it.
Image may be NSFW.
Clik here to view.
When you go through any album, do you wish you had a magical wand that could show pictures only from a particular day, or location or person? If you do, then Google Photos will do the trick for you. You can search for any specific location, person, object or even date in the search box of the app. The app also offers suggestion for places and people that feature often, so you can quickly look them up and segregate pictures.
Image may be NSFW.
Clik here to view.
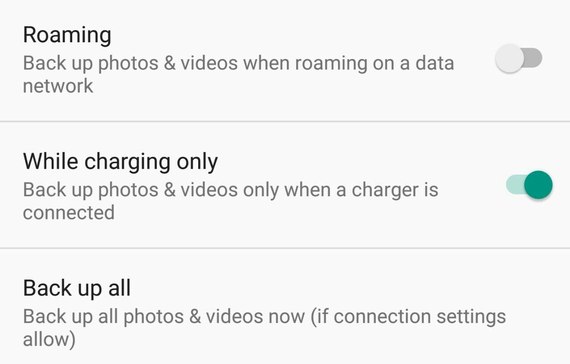
One complaint we all have with apps that upload data in the background is that they tend to drain the battery at inconvenient times. Google Photos gives you an option where you can opt to sync photos with Google Drive only when your device is connected to a power source. You can also give the app an instruction to not sync data over cellular data or when you are on roaming.
To make these changes, you need to head over to the Photos app, open the hamburger menu on the side and scroll into Settings. Under Settings, choose Backup & Sync and then choose what works the best for you. For some reason, Google has decided to do away with this feature from the iOS version of the app, though we hope it comes back soon.
Image may be NSFW.
Clik here to view.
If you like to take a lot of pictures on your Android phone and have a limited capacity, then chances are you take pictures, back them up and then delete them. This is a rather tedious process. Google Photos makes this whole thing really simple. The application gives you an option where it can save you a lot of internal memory by simply deleting photos that it has backed up. This can help you recover a ton of space on your phone and also save the hassle of manually having to delete the backed up images.
You need to head over to the hamburger menu, click on Settings and then choose Free Up Device Storage and you are good to go.
Image may be NSFW.
Clik here to view.
By default, any camera application attaches your location to the metadata of the image that it is clicking. This can be a bit of a problem if you are going to be sharing the images as it is. Using Google Photos, you can by default remove the geo-location data that comes with the image when it is being uploaded. As a result, any image that you share from Google Photos will not contain any sort of geo-location information.
To enable this feature, click on Settings and you will see the option to Remove Geo Location.
Image may be NSFW.
Clik here to view.![2015-12-18-1450413669-6163263-autogenerated.jpg]()
Google Photos does a wonderful thing, where it automatically takes your burst shots or shots taken at a very short interval at the same location and converts it into GIFs. Not just this, it also automatically creates a collage from the images that are contextually relevant and gives you a notification when it is done.
Some of this work is really awesome, and if you do not want to miss out on it, you must save this auto-generated content by opening the Assistant window located inside the hamburger menu. All your auto-generated content lives here and you get an option to save it to your gallery. If you do not save this content, and by mistake swipe the card away, the content will be gone forever. Not just animations and collages, the app is also capable of creating a whole movie (for example, it will create a movie of special moments if it detects you've been on a trip) -- do keep an eye on some of these awesomely edited videos too.
Image may be NSFW.
Clik here to view.![2015-12-18-1450413719-6971500-Selectall.jpg]()
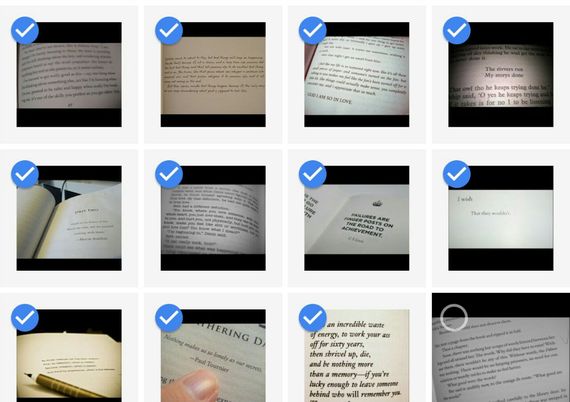
You can easily share images with your loved ones on Google Photos. Simply click on the photo that you want to share and using the Menu, send the photo using the app that you want. However, what if you want to select more than one image, or say all the images that you can see on the screen? You simply need to long press on one image and then go on to select all the others that you want without lifting your finger. If you want to select the images on the entire page, simply long press the image on top left and drag your finger right across the diagonal of the display. This feature definitely mimics of the new selection method that we have come to appreciate on iOS devices.
Image may be NSFW.
Clik here to view.![2015-12-18-1450413831-6102852-views.jpg]()
Do you like to give equal importance to all the pictures that are showing up, or do you like a slightly more detailed view, where some pictures are a bit larger than the others? Either way, you can select the view you want in the Photos app. You can simply switch between the views that you wish by pinching in for an overview; you can pinch in to have a more detailed or, as Photos calls it, a comfortable view. You can pinch all the way in, where the app shows you your pictures segregated by the months in which they were clicked, thereby giving you the chance to either have a bird's eye view or a detailed view based on your choice.
Image may be NSFW.
Clik here to view.![2015-12-18-1450413868-4234788-Sharedalbums.jpg]()
Imagine that you are on a vacation with a bunch of friends and all of you go ahead and click some pictures. Now comes the tough part -- getting all the pictures together. We generally rely on the likes of WhatsApp or even Dropbox, where we upload the pictures and share them with friends. But unless one friend manually puts in the effort to put them together, nobody is able to see all the pictures. Google Photos comes with a Shared Album feature, where users can start a new album. You can select a bunch of pictures and using the share icon, start a New Shared Album. You will get a link post this, which you can share with your friends; once they click on it, they will be able to see your shared pictures in the album and contribute to it. You can change the name of the album and can add as many contributors as you wish to.
Image may be NSFW.
Clik here to view.![2015-12-18-1450413914-1293160-links.jpg]()
If you have a collection of say 100 pictures that you want to share with your friends, the logical thing to do would be to upload them on the web and simply share the URL where they are located. With Google Photos already taking care of the bulk upload part, you can selectively share images with your friends or relatives by generating a unique URL which will contain only your selected images. Simply select the images you need to share and click on the Share icon to generate the unique link containing those images. Only the selected images will be visible to the person with the shared link. Not to forget that thanks to this you will spare your friends a barrage of images in their IM windows, which is just a massive pain to manage.
Image may be NSFW.
Clik here to view.![2015-12-18-1450413961-379216-Google_Photos_on_desktop.jpg]()
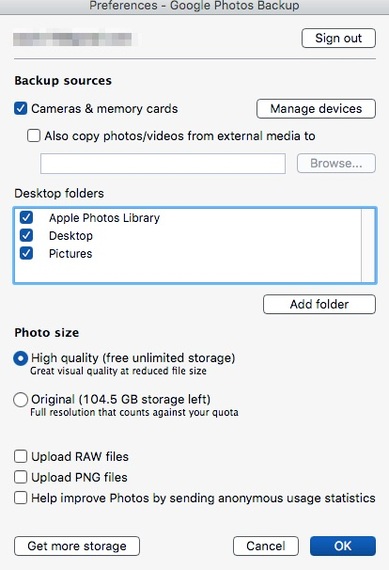
You can use Google Photos to back up pictures from your desktop, be it Mac or Windows. You need to download the Google Photos Backup app and install it on your computer and then select the folders that you wish to back up from. The photos once backed up are available to view across all your devices that are running the Google Photos application. The desktop app works just like the mobile app, where it uploads the pictures in the background.
Those are the ten different ways how we think you can get the most out of your Google Photos. Hit us up if you think there is something we have missed out on and we would be glad to check it out ourselves. Happy sharing!
Image may be NSFW.
Clik here to view.![]() Like Us On Facebook |
Like Us On Facebook |
Image may be NSFW.
Clik here to view.![]() Follow Us On Twitter |
Follow Us On Twitter |
Image may be NSFW.
Clik here to view.![]() Contact HuffPost India
Contact HuffPost India
Also see on HuffPost:
1) The search is really powerful
Image may be NSFW.
Clik here to view.

When you go through any album, do you wish you had a magical wand that could show pictures only from a particular day, or location or person? If you do, then Google Photos will do the trick for you. You can search for any specific location, person, object or even date in the search box of the app. The app also offers suggestion for places and people that feature often, so you can quickly look them up and segregate pictures.
2) Back up only when you are connected to a charger
Image may be NSFW.
Clik here to view.
One complaint we all have with apps that upload data in the background is that they tend to drain the battery at inconvenient times. Google Photos gives you an option where you can opt to sync photos with Google Drive only when your device is connected to a power source. You can also give the app an instruction to not sync data over cellular data or when you are on roaming.
To make these changes, you need to head over to the Photos app, open the hamburger menu on the side and scroll into Settings. Under Settings, choose Backup & Sync and then choose what works the best for you. For some reason, Google has decided to do away with this feature from the iOS version of the app, though we hope it comes back soon.
3) Delete images once they are backed up
Image may be NSFW.
Clik here to view.

If you like to take a lot of pictures on your Android phone and have a limited capacity, then chances are you take pictures, back them up and then delete them. This is a rather tedious process. Google Photos makes this whole thing really simple. The application gives you an option where it can save you a lot of internal memory by simply deleting photos that it has backed up. This can help you recover a ton of space on your phone and also save the hassle of manually having to delete the backed up images.
You need to head over to the hamburger menu, click on Settings and then choose Free Up Device Storage and you are good to go.
4) Remove your geo-location
Image may be NSFW.
Clik here to view.

By default, any camera application attaches your location to the metadata of the image that it is clicking. This can be a bit of a problem if you are going to be sharing the images as it is. Using Google Photos, you can by default remove the geo-location data that comes with the image when it is being uploaded. As a result, any image that you share from Google Photos will not contain any sort of geo-location information.
To enable this feature, click on Settings and you will see the option to Remove Geo Location.
5) Ensure you do not lose out on any auto-created content
Image may be NSFW.
Clik here to view.

Google Photos does a wonderful thing, where it automatically takes your burst shots or shots taken at a very short interval at the same location and converts it into GIFs. Not just this, it also automatically creates a collage from the images that are contextually relevant and gives you a notification when it is done.
Some of this work is really awesome, and if you do not want to miss out on it, you must save this auto-generated content by opening the Assistant window located inside the hamburger menu. All your auto-generated content lives here and you get an option to save it to your gallery. If you do not save this content, and by mistake swipe the card away, the content will be gone forever. Not just animations and collages, the app is also capable of creating a whole movie (for example, it will create a movie of special moments if it detects you've been on a trip) -- do keep an eye on some of these awesomely edited videos too.
6) Easy to select all the pictures on the screen
Image may be NSFW.
Clik here to view.
You can easily share images with your loved ones on Google Photos. Simply click on the photo that you want to share and using the Menu, send the photo using the app that you want. However, what if you want to select more than one image, or say all the images that you can see on the screen? You simply need to long press on one image and then go on to select all the others that you want without lifting your finger. If you want to select the images on the entire page, simply long press the image on top left and drag your finger right across the diagonal of the display. This feature definitely mimics of the new selection method that we have come to appreciate on iOS devices.
7) Change the view to suit you
Image may be NSFW.
Clik here to view.

Do you like to give equal importance to all the pictures that are showing up, or do you like a slightly more detailed view, where some pictures are a bit larger than the others? Either way, you can select the view you want in the Photos app. You can simply switch between the views that you wish by pinching in for an overview; you can pinch in to have a more detailed or, as Photos calls it, a comfortable view. You can pinch all the way in, where the app shows you your pictures segregated by the months in which they were clicked, thereby giving you the chance to either have a bird's eye view or a detailed view based on your choice.
8) Collaborate on a shared album
Image may be NSFW.
Clik here to view.

Imagine that you are on a vacation with a bunch of friends and all of you go ahead and click some pictures. Now comes the tough part -- getting all the pictures together. We generally rely on the likes of WhatsApp or even Dropbox, where we upload the pictures and share them with friends. But unless one friend manually puts in the effort to put them together, nobody is able to see all the pictures. Google Photos comes with a Shared Album feature, where users can start a new album. You can select a bunch of pictures and using the share icon, start a New Shared Album. You will get a link post this, which you can share with your friends; once they click on it, they will be able to see your shared pictures in the album and contribute to it. You can change the name of the album and can add as many contributors as you wish to.
9) Do not share images, share links
Image may be NSFW.
Clik here to view.

If you have a collection of say 100 pictures that you want to share with your friends, the logical thing to do would be to upload them on the web and simply share the URL where they are located. With Google Photos already taking care of the bulk upload part, you can selectively share images with your friends or relatives by generating a unique URL which will contain only your selected images. Simply select the images you need to share and click on the Share icon to generate the unique link containing those images. Only the selected images will be visible to the person with the shared link. Not to forget that thanks to this you will spare your friends a barrage of images in their IM windows, which is just a massive pain to manage.
10) Back up your desktop pictures
Image may be NSFW.
Clik here to view.
You can use Google Photos to back up pictures from your desktop, be it Mac or Windows. You need to download the Google Photos Backup app and install it on your computer and then select the folders that you wish to back up from. The photos once backed up are available to view across all your devices that are running the Google Photos application. The desktop app works just like the mobile app, where it uploads the pictures in the background.
Those are the ten different ways how we think you can get the most out of your Google Photos. Hit us up if you think there is something we have missed out on and we would be glad to check it out ourselves. Happy sharing!
Image may be NSFW.
Clik here to view.
 Like Us On Facebook |
 Image may be NSFW.
Clik here to view.
 Follow Us On Twitter |
 Image may be NSFW.
Clik here to view.
Also see on HuffPost: